
 Hey, I'm Emily Jones. I'm in the 9th grade. I am in Mrs. Cauble's Art 1 class. Ever since I was little, I loved watching my uncle Nat Jones draw. I soon became interested in drawing. In this assignment, we had to choose a picture to paint and make three changes to it. I chose a bird in a pile of snow. I changed it from a pile of snow to a rock and made it a night scene instead of day. I love the way this turned out, because as I sketched it it looked awful. As I began to paint, it started to look better. ^.^
Showing posts with label Art 1. Show all posts
Showing posts with label Art 1. Show all posts
Friday, November 21, 2008
Winter Scenes in Art 1: The Sequel
Hey, I'm Emily Jones. I'm in the 9th grade. I am in Mrs. Cauble's Art 1 class. Ever since I was little, I loved watching my uncle Nat Jones draw. I soon became interested in drawing. In this assignment, we had to choose a picture to paint and make three changes to it. I chose a bird in a pile of snow. I changed it from a pile of snow to a rock and made it a night scene instead of day. I love the way this turned out, because as I sketched it it looked awful. As I began to paint, it started to look better. ^.^

Even More Winter Scenes in Art 1
 My name is Katie Wilton and I'm in Mr. Davis' Art 1 class. Our assignment was to take a winter photo that he printed out and make a painting with at least three substantial changes. I had a picture of two cows in a field of snow and I added elf ears to my cows (Bob and Joe) and Bob has antlers. Joe has a santa hat. I also changed the trees and added snow in the background. In the original picture, Bob was solid black with only a patch of white on his forehead and made him white with black spots. I think it turned out pretty good but the snow flakes should be neater.
Atmospheric Perspective in Art 1
 Hi - my name is Billy Cue. I am in Mr. Davis`s 1st period Art 1 class. Our assignment for this project was to use basically a color scale that we did about a week before we started this. We marked each set of buildings, mountains, or sky a different color. There were 5 sets, with the 1st being the lightest, 2nd being a little bit darker, 3rd being the pure color, 4th being the color + a little bit of black, and 5th being black plus a little bit of color. This took me 3 or 4 days to do. I wanted to make this my best piece of art so far and I'm happy that I succeded in doing so.
Thursday, November 20, 2008
Winter Scenes in Art 1

Wednesday, November 12, 2008
Monochromatic Self-Portraits in Art 1
 Hi, my name is Kayla Thackston. I'm in Mr. Davis' 1st period Art 1 class (and by the way, he's an awesome teacher - already one of my favorites.) This is my self portrait painting. It took me a day and a half to finish. The second morning, it was kinda hard to get the same shade of purple that I had started out with. To get a lighter color, I added white and to get a darker color, I added black. I chose purple because it's my favorite color and actually, it turned out a lot better than I thought it would - although it could have been better. (LOL) He had us start out learning how to mix the primary colors to get secondaries and intermediates, and I've never done that before. It turned out pretty good. This isn't one of my favorite pictures that I've done in here, but it was really fun.
Tuesday, November 11, 2008
Color Reduction Linocuts in Art 1

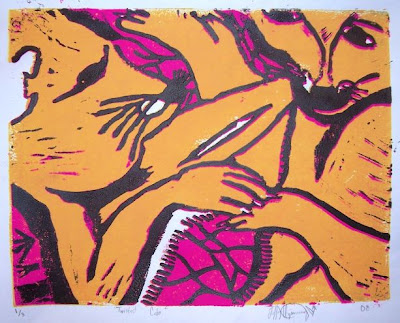
Hi everyone! My name is Tiffany R. Kijsamnong (kis-sam-nong). I am in the 12th grade, in Art 1 class with Mr. Ragland. This was my first time ever to do this type of printmaking. I call this print "Twisted Cubs". The reason for this name is because you can actually look at the picture in any way, and it still looks like 2 cubs playing (which was my intention). This took a bit of work and time. The process took a lot of pencil drawing at first, then transferring the drawing to the linoleum, tracing over the pencil lines with a sharpie, then cutting out sections of the linoleum with a cutting tool. We used a lot of ink. You can see I used the colors dark yellow, magenta, and black. I had to think about the colors in reverse and focus on hatching techniques for value. I didn't expect it to come out the way it did, but it worked out great. The things I would change if I could is maybe a little more detail and texture. I'd also like to try more than 4 colors. I really enjoy printmaking! One day I hope to continue this kind of thing in college. It's a really fun thing to experience and do. Art in general is an amazing thing. Not only the work, but the history. Give it a try sometime, you will find the fun in it.
Thursday, November 6, 2008
Linocuts in Art 1
 Hey, what's up, Internet people. My name is Zach Raymer and I am a senior here at Woodmont High School. I attended Hillcrest High School last year and I somehow got stuck in this class. At first it was a disappointment, and seemed to be a way to torture me through my senior year. After being in this class my mindset has changed. It's a pretty enjoyable class to attend every day. The assignment was to persuade people on a certain topic, or something that symbolizes a certain meaning in life. I chose a raised Football helmet in the air. The raised helmet symbolizes victory! This is shown many times during football in the big leagues all the way down to the pee-wee leagues. We had to carve out the design on a linoleum block - the objects we carved out turned out white. The portion on the linocut that was left uncarved remained black from the ink. After this time consuming process, we applied ink to the linocut and pretty much used it as a stamp. We pressed the linocut onto a sheet of paper and the design applied straight onto it. The assignment was a little tough because I chose to do something with little specific lines, which was the face mask. I had to take my time to get it just right. Some pieces didn't turn out as good as I hoped they would have, but overall I'm pretty impressed and proud of how the linocut turned out.
Wednesday, October 29, 2008
Writing and Drawing Comic Strips in Art 1

 Mr. Davis's Art 1 classes recently learned how to create their own comic strip characters and write their own three panel comic strips. Students began by creating a large collection of original characters, and then gradually narrowing down the collection until they decided on a main character for their original comic strips.
Students planned out entire personalities for their main characters. They drew how the character spends a typical day, where the character works and goes on vacation, and what situations make the character feel strong emotions.
Using the characters and their personalities, Art 1 students wrote three-panel comic strips, using the setup/conflict/punch line formula. Students drew their final comics using the same materials comic strip professionals use - illustration board, pen and ink, and colored pencils.
Wednesday, October 15, 2008
Linocuts with Art 1
 Mr. Ragland's Art 1 students recently learned how to create 3-Color Reduction Prints using linoleum.
Using reference photos of animals, students did drawings featuring crosshatching, stippling, and hatching. No blended shading whatsoever!
Student transferred the drawings to rectangles of linoleum, and then used linoleum cutting tools to cut away the areas to be left white. Next, they printed their linoleum cuts one color at a time. For example, after printing black, students cut away all of the black areas and printed again using the next color. They did this three separate times, resulting in the beautiful three color prints you see in these photos.


Subscribe to:
Posts (Atom)

 Posts
Posts


