Showing posts with label Linocuts. Show all posts

Tuesday, November 11, 2008

Color Reduction Linocuts in Art 1


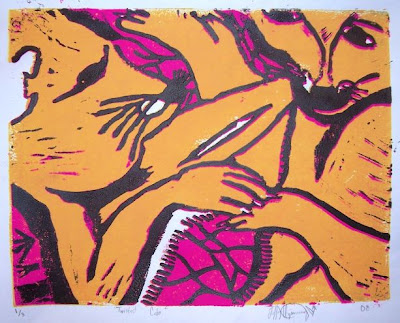
Hi everyone! My name is Tiffany R. Kijsamnong (kis-sam-nong). I am in the 12th grade, in Art 1 class with Mr. Ragland. This was my first time ever to do this type of printmaking. I call this print "Twisted Cubs". The reason for this name is because you can actually look at the picture in any way, and it still looks like 2 cubs playing (which was my intention). This took a bit of work and time. The process took a lot of pencil drawing at first, then transferring the drawing to the linoleum, tracing over the pencil lines with a sharpie, then cutting out sections of the linoleum with a cutting tool. We used a lot of ink. You can see I used the colors dark yellow, magenta, and black. I had to think about the colors in reverse and focus on hatching techniques for value. I didn't expect it to come out the way it did, but it worked out great. The things I would change if I could is maybe a little more detail and texture. I'd also like to try more than 4 colors. I really enjoy printmaking! One day I hope to continue this kind of thing in college. It's a really fun thing to experience and do. Art in general is an amazing thing. Not only the work, but the history. Give it a try sometime, you will find the fun in it.

Friday, November 7, 2008

Environmental Linocuts in Art 2

Hey. My name is Tiana Caple. I'm in the 11th grade, Class of 2010. I did my Linoleum Block print on nature. We were supposed to do a piece of art that expresses a cause. The meaning to my painting is this: "If you keep the world clean, then you will notice how beautiful it is." At first, we drew our copy on a piece of paper, then we transferred it to the block. Then we carved out the white parts that we wanted to cut out. The hard part was cutting out the little lines around each shape. I thought i was going to kill myself. Luckily I didn't. The easiest part was rolling the black ink on the block and printing four copies on the paper. Doing this project was really cool!

Thursday, November 6, 2008

Linocuts in Art 1

Hey, what's up, Internet people. My name is Zach Raymer and I am a senior here at Woodmont High School. I attended Hillcrest High School last year and I somehow got stuck in this class. At first it was a disappointment, and seemed to be a way to torture me through my senior year. After being in this class my mindset has changed. It's a pretty enjoyable class to attend every day. The assignment was to persuade people on a certain topic, or something that symbolizes a certain meaning in life. I chose a raised Football helmet in the air. The raised helmet symbolizes victory! This is shown many times during football in the big leagues all the way down to the pee-wee leagues. We had to carve out the design on a linoleum block - the objects we carved out turned out white. The portion on the linocut that was left uncarved remained black from the ink. After this time consuming process, we applied ink to the linocut and pretty much used it as a stamp. We pressed the linocut onto a sheet of paper and the design applied straight onto it. The assignment was a little tough because I chose to do something with little specific lines, which was the face mask. I had to take my time to get it just right. Some pieces didn't turn out as good as I hoped they would have, but overall I'm pretty impressed and proud of how the linocut turned out.

Wednesday, October 15, 2008

Linocuts with Art 1

Mr. Ragland's Art 1 students recently learned how to create 3-Color Reduction Prints using linoleum.
Using reference photos of animals, students did drawings featuring crosshatching, stippling, and hatching. No blended shading whatsoever!
Student transferred the drawings to rectangles of linoleum, and then used linoleum cutting tools to cut away the areas to be left white. Next, they printed their linoleum cuts one color at a time. For example, after printing black, students cut away all of the black areas and printed again using the next color. They did this three separate times, resulting in the beautiful three color prints you see in these photos.